|
|
 |
|
|
|
|
|
|
 |
 |
 |
|
 |
|
|
 |
|
|
- 2 N76.2 Sensitizer (formerly B-76): 4 fl oz (120 ml) or more of concentrate is added to each gallon (3.785 liters) of de-ionized water. Harder to wet surfaces may require 12 oz. or more. The solution is placed in container #1 and is delivered to the Sensitizer Gun. (Model #BUSRS-0)
- Reducer #1 and Modifier D #7: Shipped as separate concentrates, which are then mixed together. 4 fl oz. (120ml) of each chemical is added to one gallon (3.785 liters) of de-ionized water. The solution is placed in container #2 and delivered to the right side of the Silvering Gun (model #BUS2RS-2). Some customers have found that not using the Modifier with the Reducer produces less yellowness is the silver finish.
- DX Silver: 8 fl oz. (240 ml) of concentrate are added to each gallon (3.785 liters) of de-ionized water. The solution is placed in container #3 and is delivered to left side of Silvering Gun. (Model #BUS2RS-2)
|
|
- The general procedure is to:
- Fill a container half full with de-ionized water
- Add the proper quantity of chemical concentrates
- Fill the rest of the container with de-ionized water.
- The silver concentrations suggested are minimums. If faster silver deposit is desired, just increase Reducer, Modifier and DX proportionately.
- Preferably, these solutions should be made daily for the day’s production. However, the quantity remaining at the end of the day may be used for the next several days, providing that the containers have been tightly sealed, and the silvering quality is checked on clean glass, glass microscope slides are excellent for this application, prior to commencing work again.
- If the silver gun does not yield a perfect mirror on the glass, the solutions have become too old and must be discarded and fresh silver and reducer/modifier made up.
- If silvering still remains imperfect, then new sensitizer solution must also be made.
- If there are still problems, there may be a problem with the purity of the de-ionized water and the water purifying cylinders may need to be replaced.
- (See the
Troubleshooting section for further information).
The solutions should also not be exposed to high temperatures, as it will affect their quality. For best results, keep silver chemicals, reducer, and modifier in a refrigerator. Do not let freeze.
Flush guns with de-ionized water only.
B. Primers:
- Primers prepare the substrate for the basecoat by two functions:
- If the substrate is porous, the primer will seal the substrate improving the smoothness of the basecoat when applied.
- If the substrate is difficult to adhere to such as polypropylene, polyethylene, aged coatings, or glass, the primers will improve the adhesion of the basecoat to the substrate.
- 8501 Primer: For polypropylene substrates only. Air dries in seconds. (Also available in a pigmented black)
- 8038 Primer: For polyethylene substrates only. Air dries in seconds. (Also available in a pigmented black)
- 8057 Primer: For glass, crystal and ceramic substrates only. Must be force cured.
C. Basecoats
- Basecoat provides the adhesion to the substrate/surface applied to and also produces a smooth resin rich (glossy) surface for the foundation of accepting the silver.
- 3101C Basecoat: Ready -for-use single component lacquer. This lacquer is suitable for nearly every surface, but must be very carefully topcoated. It requires (4) four hours of air-dry time or (1) one hour or less of force-dry time. Only use 3012 Topcoat.
- 3035 Basecoat: A single component basecoat for solvent sensitive plastics and excellent adhesion to metals. 3035 can be used in dip, flow coat or spray applications. 3035 requires 24 hours air dry or 1.5 hours @ 165oF May only use 3091 or 3042 Topcoats.
- 4098/4905 Polyurethane Basecoat: A solvent based two component polyurethane basecoat with excellent flow, leveling, flexibility and adhesion to plastics and metals. 4098/4905 requires 24 hours air dry or 1 hour at 150oF. May use one component or two component topcoats.
- 4099/4906 Polyurethane Basecoat: A solvent based two-component polyurethane basecoat pigmented black for maximum contrast for silvering. Same performance and cure schedule as 4098/4905 Polyurethane basecoat.
D. Topcoats
- The topcoat used will depend on economics and the desired end use of the final product.
- 3012 Clear Lacquer Topcoat: A solvent based economical lacquer topcoat with fast dry times. Excellent for decorative finishes. Not recommended for exterior applications. May be thinned with 126A Thinner as necessary.
- 3092 ATTopcoat: A solvent based economical topcoat designed not to attack plastics. Requires 24 hours air dry or 40 minutes at 125oF.
- 4056/4901 Polyurethane Topcoat: A solvent based two component polyurethane topcoat with excellent hardness, exterior durability, and chemical resistance. Requires 24 hours air dry or 40 minutes at 125oF. Is available in both traditional and heavy formulas. May be used as a single or dual component.
II. Hardware Requirements:
A. Spray Booths:
1. Standard Paint Spraying Booth - for applying base and topcoats
- Use a ventilated spray booth with standard spray guns.
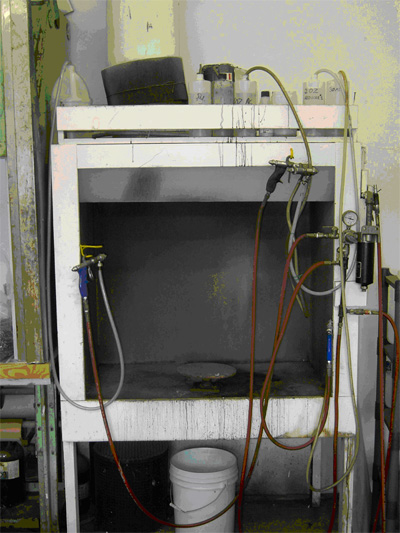
2. Silver Spraying Booth - for the silvering process
- The spray booth used for silvering is a modification of a standard paint-spraying booth. It must be constructed of wood or plastic.
- The size of the booth is determined by the work to be metallized.
- A general rule is one should allow two feet on each side greater than the largest dimension of the pieces. For small pieces a table height booth is adequate. For large pieces a walk in booth may be desirable.
- The Silver Spray Booth must be constructed so that the excess Silver chemicals can be collected in a separate container. Please see the section titled “Silver Waste Disposal” for further information on this topic.
- Silver Solutions should be delivered to guns from three polyethylene jugs, preferably with bottom outlets.
- Most manufacturers find it very helpful to make accommodations on top or around the silver spray booth to place the jugs of silver solutions high enough for gravity to assist in spraying.
- Tubing used from jugs of silver solution to spray guns should be acid and base resistant - Tygon is recommended.
- Clamps and fittings for the spray guns/tubing should be made out of stainless steel.
An example of a silver spray booth set up.
Spray Guns for the Silvering Process:
- BUS2RS-2: Double Nozzle Spray Gun for simultaneously spraying the DX Silver and Reducer solutions.
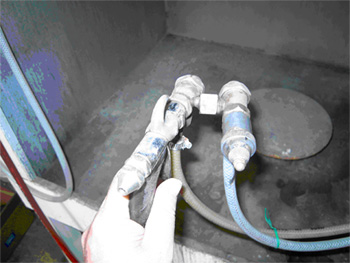
- BUSRBS-0: Single Nozzle Spray Gun for spraying the Sensitizer solution.
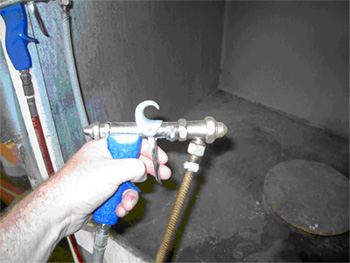
- BUF-2: Single Nozzle Spray Gun for spraying de-ionized water.
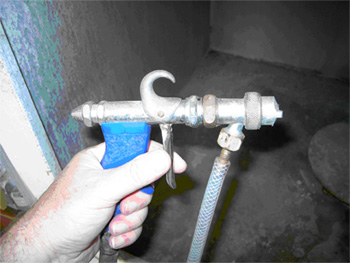
- Also, not shown… Use standard air nozzle for blowing air to remove excess water from products.
B. Air regulators / Compressor for the spray guns:
- Should be capable of delivering 60 psi of pressure.
- Water and oil filters - should be in the air line before the regulators.
C. Water De-ionizing cylinders:
- To purify the water used in the silvering process.
- The water used for mixing the chemicals and rinsing the pieces during metallizing must be extremely pure. Metallic salts, dissolved gases, chlorine, and organic particles must be removed or they will interfere with the clean deposition of the metal.
- The purity of the water required is at least one million ohms
- A typical water de-ionizing unit can achieve the purity required.
- These maintenance-free units are rented or sold by numerous local companies specializing in water purification and are inexpensive to maintain.
- De-ionizing cylinders should be composed of two parts.
- The first part is an activated charcoal filter
- The second part is the ion exchange resin.
III. General Preparations For Various Surfaces:
While the particulars and materials used for metallizing any particular substrate may vary from one to another, the general procedure is the same for all materials. One must prepare the surface so that a continuous film of water remains after rinsing.
Each surface is therefore basecoated (if the surface is very porous, e.g. wood, it may have to be primed first before basecoating) so as to present a brilliant appearance to the depositing silver. The properly prepared surface has a smooth, dust-free, and wrinkle-free basecoat, which is properly cured.
If the basecoat is not properly cured, the deposition of the silver will not be clean and uniform. Curing may be accomplished in many cases by allowing the item to air dry overnight. For faster through put, it is necessary to bake the finish for a short period of time at a low temperature. Baking at a low temperature always decreases the length of drying time. Heat sensitive surfaces must be air-dried.
The coatings used for priming, sealing or basecoating should be thinned in accordance to the instructions and sprayed on a dry clean surface.
** Please note: Only the basecoats sold by JEMA-AMERICAN have been specially formulated to prevent the Silver finish from tarnishing. Substituting other basecoats will not produce the desired results in both regards to the adhesion of the silver to the basecoat, as well as the appearance of the final product. Troubleshooting may also be problematical.
IV. Method of Metallizing:
The properly cured, basecoated pieces are now ready for the metallizing step. Avoid all contact with the basecoated surface. Any contact will be shown thru the silver as defects especially finger prints.
Before spraying the basecoated parts, the silver solutions and the gun balance should be checked on a small piece of clean glass. Adjust if necessary. If a perfect mirror is not obtained consult the Troubleshooting section of this manual.
Step 1: Sensitizing the Surface:
Sensitizer solution is sprayed through the single nozzle spray gun (BUSRS-0). The piece should be thoroughly covered with sensitizer and then rinsed thoroughly with de-ionized water. The sensitizer solution must wet the surface completely. If there are any water breaks and/or separations, it either indicates the presence of contamination of the basecoat, incomplete basecoat, or even evidence of incomplete priming. If this happens, a second spray and rinse can be tried.
Complete sheeting action of the rinse water is a must before proceeding with silvering step! Any areas not sheeting water will not silver!
Step 2: Silver Spray - Reducer/Modifier:
Immediately after the piece has been rinsed, and while it is still wet, spray with the Silver and the Reducer/Modifier Mix using the (2) nozzle spray gun (BUS2RS-2). The silver is sprayed from the trigger side of the gun and the reducer from the other side.
The two solutions should be coming out of the gun at close to equal volumes. The gun can be calibrated with the knobs in the back of each nozzle. The nozzles should be set so that the streams merge at least four inches from the tips. The settings for the gun can be adjusted using just de-ionized water to avoid wasting any silver solutions.
The gun should be positioned so that piece to be silvered is 3 to 5 inches beyond the merged stream. Start spraying from the bottom of piece and work up, holding the trigger while facing the piece at a 90-degree angle.
To insure a uniform silver deposit, spray using a smooth, lateral movement in one direction only. Do not use a back and forth motion! The silver is being chemically deposited - unlike lacquer or paint, which is built up in layers. It is therefore impossible to deposit more silver on an area that has already been sprayed. A back and forth motion will not produce a better finish, and in fact, too much re-spraying can result in a burnt appearance and a waste of the costly silver chemicals.
The metallized pieces are then immediately rinsed again with de-ionized water and blown with clean air to maximize the brilliance. After removing all traces of water, the topcoating should be done as soon as possible to maintain the quality of the silver layer.
V. Finishing Instructions:
The topcoat is designed to protect the silver and/or change the metallic appearance into any color metallic effect desired such as brass, gold, pewter, copper, bronze, gun metal or other metallic finish. Jema-Dyes can be added to any topcoat to create a variety of finishes. For producing a silver to chrome finish, add 1 fl oz (30ml) of Jema-Dye L100.3 Blue or Jema-Dye 4L43.1 Violet to one gallon of topcoat. Adjust the level of L100.3 dye to desired appearance.
The metallized piece still should not be handled with bare hands until it has been protected with a topcoat.
The topcoat is sprayed over the dry silver piece being careful on the first pass not to flood the object with a very wet coat. A very wet coat will yield runs and possibly attack through the silver to the basecoat lacquer. It is important to put a mist spray on first and then on the second pass a slightly wetter coat. This yields a more uniform color.
Antiquing or further decorating can now be done followed by a final clear topcoat layer if desired. Follow recommended cure schedule prior to packaging or final assembly.
VI. Safety Instructions
All chemicals, lacquers, paints and thinner must be handled carefully! MSDS (Material Safety Data Sheets) should be read prior to working with these products.
- When using the silver chemicals one should wear rubber gloves and a mask and work only within well ventilated areas.
- The silver solution in particular will cause brown stains on the skin and could cause damage to the lungs if inhaled while spraying.
- The reducer and sensitizer solutions contain a variety of alkali and acids, which are corrosive.
- The silver solution and the buffer solution should never be mixed in concentrated form! They should always be added to water during the dilution process. If the concentrated solutions are allowed to dry after mixing, it is possible form an explosive compound, which can detonate very easily. (While this has never happened in over 50 years of selling these items, we feel it is important that anyone working with these materials be aware of the possibilities)
- All paints, lacquers and thinners are flammable materials and therefore must not be used in a smoking area or where sparks can come in contact with them. Containers should be grounded when pouring from one to another.
- Good housekeeping dictates that all chemical bottles (both concentrate and ready-to-use) should be cleaned with water before discarding to insure no residue would be able to dry.
VII. Waste Disposal and Silver Recycling:
The chemical runoff from Silver Spraying is toxic and must be disposed of in an appropriate manner.
However, the silver used in the system is recyclable.
- It is often possible to locate a Silver Recovery Company that will pay to collect the excess silver. Contact Jema-American for recovery companies.
- In order to take advantage of this possibility, the excess chemicals from the silver spraying booth should be collected in containers and then filtered, to separate the silver from the water and other chemicals.
VIII. Trouble Shooting:
As in any process, problems are sometimes encountered with respect to the appearance of the finished product. It is therefore important to know where to look in order to correct any problems that occur.
If the silver deposit comes out blue or cloudy it may be caused by one or several problems.
- The base coat may not be dry enough.
- The sensitizer may be too old and therefore should be changed.
- The de-ionized water has gone bad and therefore the de-ionizer should be recharged.
- The calibration of the gun has been changed. The silver to reducer/modifier ratio is off.
If the silver appears dark or brownish - the reducer is coming out much greater in quantities than the silver or the sensitizer was not completely washed off before silvering.
If no silver appears to be depositing - the temperature may be below 60F.
- We recommend at least 70F for a proper job.
In extremely hot weather on several surfaces the silver may appear dull in spots.
- This can be corrected by lowering the concentration of the reducer from 4 fluid ounces per gallon to 2 or 1-˝ ounces per gallon.
If the topcoated piece looks dull or full of spots - the topcoat has been applied on too heavy.
An effective first step in solving any problems is to determine in which part of the process the problem is occurring. Metallizing a clean piece of glass (which has not been basecoated) can help. Always sensitize first.
If the glass is metallized without any problems, then the problem most likely lies in the basecoat or topcoat application. If, on the other hand, the glass does not come out perfect after metallizing, at least some part of the problem lies in the silvering step.
When trying to isolate a problem in either the basecoat, silvering or topcoat step, one should remember that either the chemicals or the technique could be the source.
If you are still experiencing problems please do not hesitate to contact us for further technical assistance: Contact Us.
|
|
|